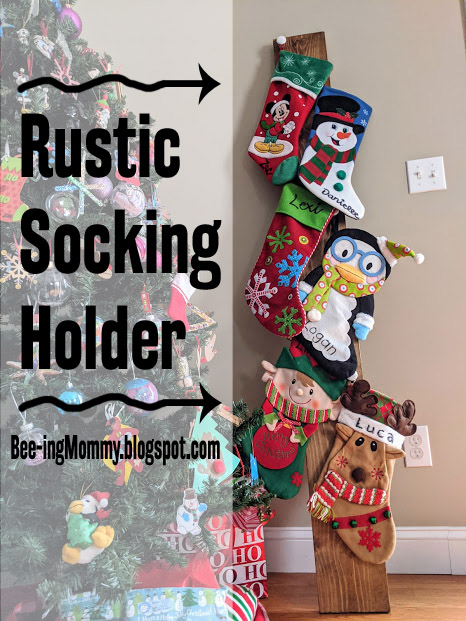
Last fall our family grew by two little feet. Our family of five became a family of six which means there is just more of us to love.
When we pulled out all the Christmas decorations, I quickly realized that I needed to updated some of my past homemade Christmas decorations like the Personalized Wood Snowman Family and add a felt present to the kids Felt Christmas Tree. With a new baby and all the craziness surrounding the holidays, I decided to wait to update the decorations until this year, but my husband and I did decide to make a new rustic stocking holder so we could hang all six of our stockings.
We finished the stocking holder a few days before Christmas, just in time for Santa to fill them with goodies! While I am sad that I had to part with my past stocking holder, I am loving the simplicity of our new stocking holder.
To make the stocking holder you will need a piece of wood and some cabinet knobs. That's it! You can add more decorations or stain the wood to match your other Christmas decorations or home decor if you want but you don't have to. This is a super simple, easy to make, stocking holder. The best part is that it will actually hold the weight of the stockings once Santa fills them with goodies.
Simple Rustic Wood Stocking Holder
Supplies:
- Wood Board - we used a 7"x 6ft (possibly 6 x 6)
- Wood Stain
- Cabinet Knobs for the number of stockings - we used simple white knobs
- Drill
How To:
1. Buy or find a piece of wood and sand it if needed. The wood can be any size you'd like. We bought a piece of wood from Lowes for $6-$8. It measures 3/4" by 7" by 6ft. (My guess is it's the 1x6x6 that is listed online now.)
2. Stain the wood a color of your choice. Let Dry.
3. Measure and mark where you want to attach the knobs. Keep in mind the size of the stockings you will be hanging. Remember to leave room at the bottom for your last stocking to hang without it touching the ground.
I off set the knobs to leave room for the stocking without covering other stockings. You can attach the cabinet knobs however you prefer.
DO NOT attach the knobs right on the edge of the wood. This will help prevent you from splitting the wood.
We put the first know at the top corner. We then measured about 6" down and attached the second knob on the opposite side. It is about 8" diagonal.
The third knob was attached about 20" below the first knob. The spacing was determined by measuring the length of the stockings. I also laid the stockings how I wanted them in my head to help determine the spacing.
4. Attach the knobs and hang your stockings for all to see! We used a drill to pre-drill the holes to attach the knobs. You may be able to hand screw the knobs in depending on what type of knobs you buy. We bought the cheap white ones from Lowes that were around a $1 each.
This rustic stocking holder is easy to make and doesn't pull attention away from your stocking pattern. It's simplicity makes it the perfect Christmas addition to almost any theme. The stocking holder cost under $15 to make. The price will vary depending on the type and number of cabinet knobs you buy and if you need to buy stain.
If you don't like the stain you choose, sand the wood and stain it again. You can even paint the wood any color you'd like. I prefer a lighter stain to help bring out the detail in the wood.
The stocking holder matches the theme I'm going with in our new house perfect. The color we stained the stocking holder is very close to the color we used for the entryway.
One of the best parts about this stocking holder aside from it being super easy to make is that you don't have to put holes in the wall like a hanging one and you don't need a fireplace or mantle to set it on meaning it can go anywhere! You can lean it on any wall in the house. I personally like placing it close to our Christmas tree, but the possibilities are endless. Another plus is that this stocking holder actually holds the weight of the stockings once Santa fills them with goodies meaning your stockings won't be sitting on the ground Christmas morning. Hope you enjoy your this tutorial and your new stocking holder as much as I have so far!
You may also like:
- 7 Gift Alternatives to Toys & Clothes
- 10 Gift Giving Tips that won't Break the Bank
- 100+ Stocking Stuffer Ideas for Men
- Christmas Ornament Wreath Tutorial
- Elf on the Shelf Daily Prank Guide
- Felt Christmas Tree Tutorial
- Milk Jug Snowmen
- Pallet Christmas Tree
- Rotating Christmas Character Blocks
- "the stockings were hung..." Stocking Holder
- Wood Slice Wall Decor - Happy Fall/Tis the Season Decor


0 Comments