I'm due with baby number three soon and am going to have three kids under the age of three... fun fun! Any parent with little ones knows how expensive diapers can be so my husband and I decided to throw a beer and diaper party.
We invited our family and friends down to hang out, play games, and grill out. I didn't go all out with decorations for this party since we planned on everybody being outside for the most part but I did decide to make a beer cake as the table decoration and incase anybody needed any extra beer. There are several different ways you can make and decorate a beer cake but here is how I made mine.
We invited our family and friends down to hang out, play games, and grill out. I didn't go all out with decorations for this party since we planned on everybody being outside for the most part but I did decide to make a beer cake as the table decoration and incase anybody needed any extra beer. There are several different ways you can make and decorate a beer cake but here is how I made mine.
Supplies:
- 30 pack of beer
- Pizza Pan
- Cardboard Circles
- Tissue Paper
- Tape
- Ribbon
- Hot Glue Gun - Optional
- Decorations: I used a balloon weight, pipe cleaners and print outs of a whale and sign I made.
How To:
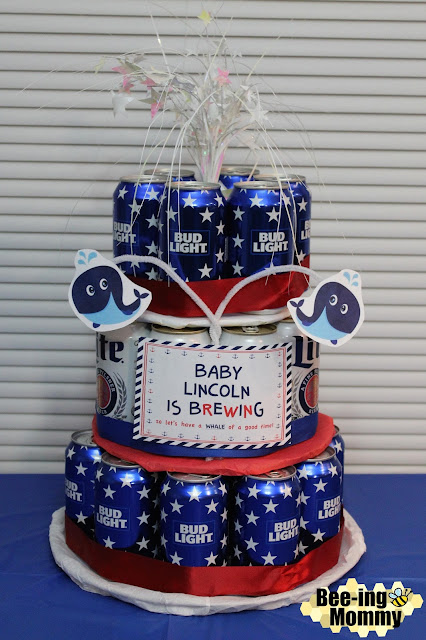
1. Line up your beer cans and make them the size you want your tiers aka layers to be. I made a three tiered beer cake and used 28 beers total but you can make your beer cake any size you want.
Bottom: 13 beers
Middle: 9 beers
Top: 6 beers
2. If you haven't already, cut out some cardboard circles to help support your beer cans once stacked. I measured across my beer cans and cut out a cardboard circle the same size as the bottom of the cans measured. I found that an X-Acto knife worked better than scissors when cutting out the cardboard.
SIZES:
Bottom: The bottom tier (13 beers) fit perfect on a 13" pizza pan. The pizza pan was sturdy enough to hold all the beer and it allowed us to move the beer cake once it was made where as cardboard probably would of folded due to the weight of the beer.
Middle: 9½" Cardboard Circle
Top: 7½" Cardboard Circle

3. Cover the pizza pan and cardboard circles with tissue paper. I wrapped each piece and tacked it with tape.
4. Layer the beer cans to create your beer cake.
Bottom: 13" Pizza Pan - 13 Beers
Middle: 9½" Cardboard Circle - 9 beers
5. Wrap ribbon around each tier and tack it with a hot glue gun or tape.
The ribbon helps keep the cans from sliding and acts as decoration.
6. Add the rest of the decorations or leave it as is.
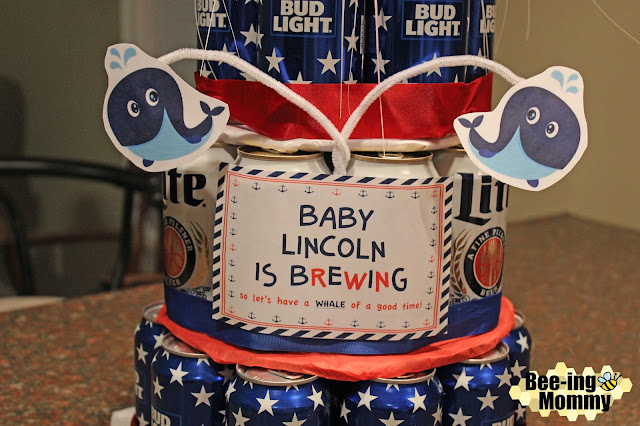
I twisted two pipe cleaners together and taped two whale print outs to them, then hot glued it to the cardboard base to keep it from falling. I then taped a sign I created over the pipe cleaners, in the middle of the beer cake. The signs says, "Baby Lincoln is BREWING so let's have a WHALE of a good time!"
7. Put your beer cake on display for your family and friends to see!
The Beer Cake was pretty easy to make and made a great table decoration for our beer and diaper party. I had all the supplies already so we just needed to buy the beer which we were planning on doing anyway. You can decorate your beer cake anyway you want to match whatever theme you are doing. You can use any brand of beer you want or more than one brand like I did. You can add lottery tickets, cigars, mini liquor bottles, candy bars, gum, bows, more ribbon, etc... to your beer cake using bamboo skewers and tape; you can even make the beer cakes as big or as small as you want to. You can even give the beer can cake as a gag gift by making it using empty cans.
A beer cake is great for 21st Birthday parties, Bachelor Parties, College Graduation Parties, etc... plus it will make the person who it is for feel more appreciative because you actually took the time to turn a 30 pack into something cool looking instead of just handing them a case and saying "Happy Birthday/Congratulations"!


3 Comments
Nice post. I used to be checking continuously this weblog and I am impressed!
ReplyDeleteVery helpful info specially the remaining part :) I handle such information much.
I was looking for this certain info for a long time.
Thanks and best of luck.
Chiquita, I really like you more than you will ever know.
ReplyDeleteThank you to your blessings on my birthday.
ReplyDelete