My husband and I have been together five years and we have been blessed with two beautiful children. When we were dating I told him that I wanted him to make me a gift for our anniversary instead of spending a ton of money. For our one year anniversary of dating I made my husband a scrapbook of our love story and he did the same, but used shutterfly to put it together. We laughed because we had the same idea. For our second dating anniversary I made him a board game called "Memory Lane" and he used a deck of card and turned them into 52 reasons why he loves me. Once again we were laughing because we both gave each other something similar and game related, guess it was meant to be!
We celebrated our two years of dating in April 2013. We went all out for our two year anniversary and glad we did because life was about to change since we found out we were expecting shortly after. For our two year anniversary we exchanged gifts, visited the Newport Aquarium then ate at Margaritaville, followed by indoor putt putt golf and a movie. That is the most dates I've ever been on in one day and I loved every minute but anyways, back to how to make the board game...
I'm going to go ahead and tell you now, if you are an impatient person then this gift is not for you because it is very time consuming and takes a lot of planning.
I'm going to go ahead and tell you now, if you are an impatient person then this gift is not for you because it is very time consuming and takes a lot of planning.
What is it?
Memory Lane is a fun homemade board game that allows you to take a trip down memory lane and share some of your favorite memories with your loved ones while trying to get enough tokens to make it back home.
Although I created the game, Memory Lane, for my husband (boyfriend at the time), it is a great family game and easy for the whole family to play!
Rules:
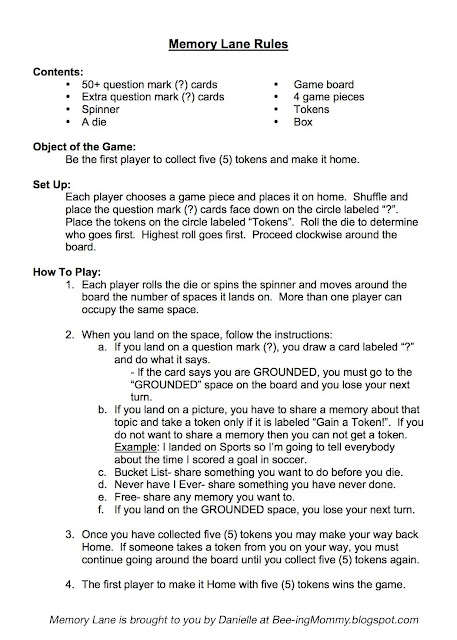
Basically the object of the game is to be the first person to collect five tokens and make it back home. You move around the board and share a memory if you land on a memory space or draw a "?" card and complete the task.
Below is a picture of the full rules I made for the game. You can save and print this image if needed when you make the game. I also included a Fun Facts page (not pictured) that I printed on the back of my rules page of some fun facts that happened while making the game.
- Old Board game - I bought Chutes and Ladders for $1.50 at a Peddler's Mall
- 50-100 Index cards - cut in half
- 18+ Standard White Name Labels - cut in half
- Markers
- Self Adhesive Shelf Liner - I used the Marble one from the Dollar General
- Electric Tape or Duct Tape
- Dice, Spinner or Both
- Tokens - you can make your own if needed
- Pictures of your significant other and you now and as children OR pictures of your family members
- Scissors
- Glue
- Laminator - optional
- Spray Paint, Duct tape or Paper to decorate the box
1. Cover the game board. First you need to cover your board game with the self adhesive liner. I used a light marble color to make the tiles stand out. I bought the liner at the Dollar General but I've seen some at Walmart and Lowes.
2. I used Electrical Tape to outline the edges of the board. The purpose of this is to cover the edges of the adhesive liner so it won't peel up. You can also use duct tape if you would prefer but I recommend cutting it in half so it isn't as thick.
NOTE: Do not stretch the electrical tape tight because it will contract back down over time, leaving the corners uncovered.
3. Create the game tiles. I used Standard White Name Labels for my tiles. Cut the labels in half, draw whatever you want on them, peel the backs off and stick them where they belong. I used the labels to make everything you see on the board: the title, tokens, tiles, etc... You will need at least 18 labels.
Your game tiles can say whatever you want them to say. I drew pictures on mine along with a word of the memory you are to share if you land on that tile. My tiles include:
- Childhood or Relatives Home
- Created Something
- Romantic Memory
- Swimming
- What's on your Bucket List?
- GROUNDED - lose a turn
- Vacation
- Attended an Event
- Sports
- Restaurant/Food in general
- Never have I Ever
- School
- Animals
- FREE - share any memory
- Holidays
- 10 Question Mark (?) tiles - these go along with the cards
4. Make the game cards.
I cut the index cards in half for my question mark (?) cards. I made over 50 question mark (?) cards and I left some blank so we could add things to the game in the future. You can always make your cards on the computer and print them out on cardstock. I drew and wrote out my cards to make the game feel more personal.
These cards have anything from gaining a token to loosing a token to moving forward or getting GROUNDED; losing a turn or stealing a token from a player of your choice. I also made three different specialty cards - Swipe a token, save and move to the free space, roll again and a joker card -you wasted a question mark (?).

I tried to make the question mark (?) cards relate to our life to make the game more fun and meaningful but you can make the cards say anything you want. Make sure you have both positive (gain a token or move ahead) and negative (lose a token or move backwards) cards. Here are a few examples of what the cards said. You can look through the pictures for some more examples. Not all my cards are pictures.
- Daylight Savings Time (spring forward) - move ahead one space
- Daylight Savings Time (fall backward) - move back one space
- Caught lying about where you were - GROUNDED
- Family Member in Crisis - give a token to someone in need
- You let the laundry build up - lose a turn
- You had three kids, kids are expensive - lose a token
- Fell in Love in college - gain a token
- Cooked a full course meal for your spouse - gain a token
- You won a $1000 shopping spree - move forward two spaces
- You forgot to feed the dog - lose a token
- You got chocolate wasted - lose a token
- Play Rock, Paper, Scissors - winner takes a token from the loser
- Pinterest Date Night - move ahead one space for being crafty
5. Make sure the cards are all facing the same direction, flip them over and draw a question mark (?) on the back of the cards. Use a highlighter because a sharpie will bleed through to the word side.
6. Optional - Laminate the question mark (?) cards and the rules page to make the game last longer then cut them out and put a rubber band around them.
7. Make your game pieces.
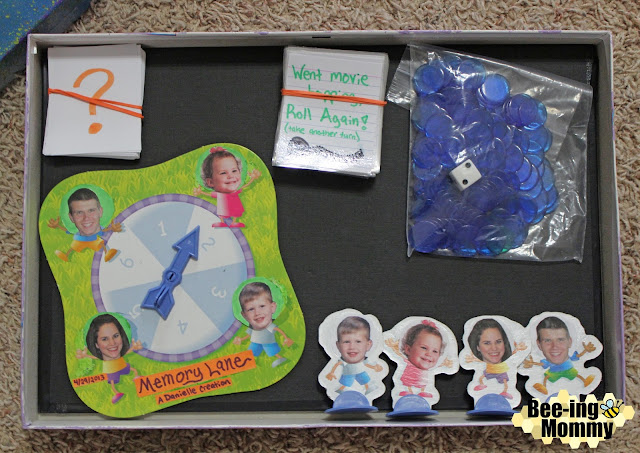
The Chutes and Ladder game I bought came with four game pieces and a spinner so I printed off pictures of our heads on computer paper of my husband and I now and when we were kids. I cut out our heads and glued them over the Chutes and Ladder characters. You can make your own people or use random objects that have significance to your family as game pieces if your board game didn't come with any.
Tokens: I used clear counter chips for my tokens but you can use anything you want. You can make your own out of paper or cardboard, use real coins, toy coins, mini rocks, buttons, beads, etc...
8. Decorate the game box.
I spray painted my box and kept running out of spray paint so I used four or five different colors but it turned out with a galaxy look to it so it worked out. Once the box dried I used glitter paint to write "Memory Lane" on the box. You can decorate your game box with duct tape, paper, paint, markers or whatever you'd like.
Put all the game pieces back in the box and wrap it up to give on your anniversary or skip the wrapping and test it our with your friends and family. I tested the game out with my sister before hand to make sure everything made sense and worked and it did!
This game takes a lot of time and planning but I'm sure your boyfriend/spouse and family will love all of the hard work you put into making it plus you have this awesome tutorial to go off of so that's a step in the right direction. Everyone who has played the game has loved it, some kids I babysat wanted to play it and said they really liked it a lot. The game, Memory Lane, is a great game for the whole family and it allows everyone to interact and ermines on the past by sharing their favorite memories. I hope you enjoyed this blog and making your version of Memory Lane as much as I loved making mine.
Comment below some of your card ideas!
Comment below some of your card ideas!


4 Comments
I seriously love your blog.. Great colors & theme.
ReplyDeleteDid you create this web site yourself? Please reply back as I'm wanting to
create my own personal site and want to find out where you got
this from or exactly what the theme is named.
Appreciate it!
Thanks so much, glad you enjoy it. I recently gave my blog a makeover and designed both the background and logo myself. The theme itself is one of blogspots basic themes.
DeleteThis is brilliant I can't believe you did all of this yourself! I love how personal it is
ReplyDeleteDebbie
Thank you, it was time consuming but well worth it!
Delete