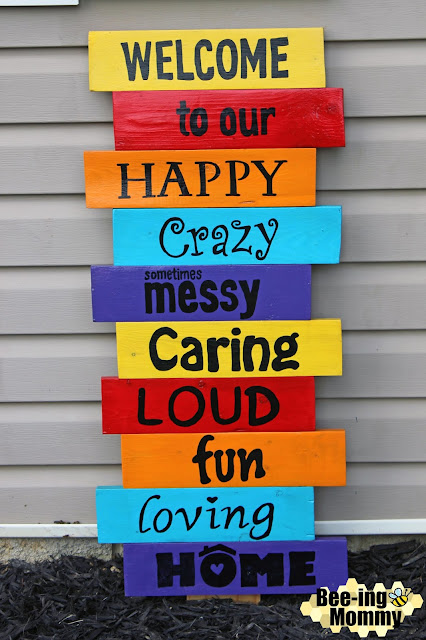
I've wanted to make a welcome sign for our house since we moved in and I finally got around to doing it. Since it has warmed up outside we were able to add a flower bed to the front of our house so it was only fitting that I got around to making a welcome sign.
Supplies:
- Pallet
- Paint
- Black Paint Pen
- Polycrylic Wood Sealer
- Paint Brush
- Pen & paper OR a print out of words
- 20+ Screws (1") & Drill
- Saw
- Sander
How To:
1. Figure out what your sign is going to say and how many pieces of wood you will need. Cut up a pallet.
I used ten pieces of 14"x3.5" wood for the front of the welcome sign and one 40" or longer piece for the back to attach the sign together.
2. Sand your wood pieces and wipe them off. If the wood is dirty or still has saw dust on them, the paint won't stick as well.
3. Paint the wood pieces the colors you want. You can paint them all the same color or rotate colors. Make sure to paint the edges because you will be able to see the edges once the sign is put together. Let Dry.
I used 5 different colors of cheap Acrylic paint. Any color paint or left over paint should work. The darker the paint the harder it will be for your words to show up.

4. Write OR Print out the words you want to use in the font and size you want to use.
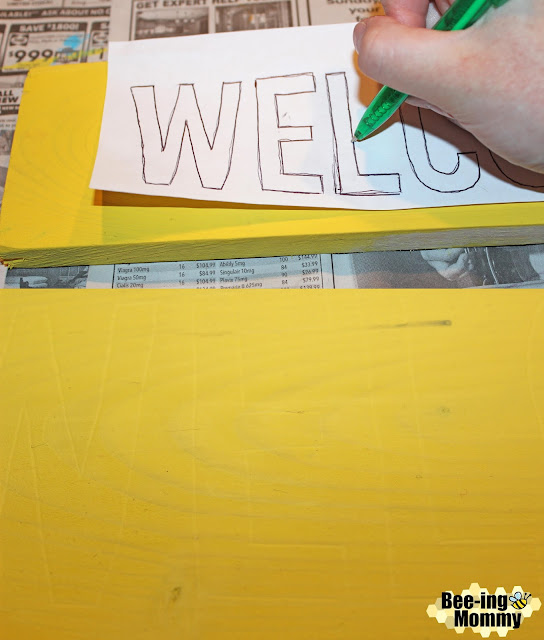
5. Transfer the words onto the wood. You can do this several different ways. In this case, I placed my words on top of the wood and centered them. I used a ball-point pen and gently traced over the words thus creating a small outline in the wood. If you look closely you can see the outline in the picture below.
*** Check out Step 4 in my blog, Growth Chart Ruler Tutorial, for another way you can transfer the words onto the wood.
6. Once you have transferred all the words onto the wood and have an outline you can go ahead and fill the words in. I used a black oil based paint pen. I followed the outline I created and filled in the rest. Let Dry.
You can use any color you want but black will stand out. I used a paint pen to save time but you can use regular black paint and a paint brush if you prefer.
I made the back piece longer on purpose so it could be buried into the ground to avoid the wind knocking it over and damaging the sign. If you are setting the sign on your porch or hanging it, the back piece of wood needs to be the length of the ten pieces of wood together, in this case, 35".
8. Begin to screw the back piece to the front pieces. I used 1" screws and placed two screws in each piece of wood, using a total of twenty screws. It is important to measure the depth of the wood so that your screws won't poke out the front of the sign thus ruining the sign.
9. Apply a wood sealer to the front and back of the sign. I used Polycrylic Wood Sealer to seal in the paint and help prevent wear and tear on the sign from harsh weather. Let Dry.
Since I used an oil based paint pen I had to use a wood sealer for oil based paint. If your sealer isn't for oil based paint it will smear the words.
10. Once your sign has dried you can dig a little hole and bury the bottom into the ground, hang it, or lean it on your front porch for your neighbors, friends and family to enjoy!
This welcome sign is colorful and definitely stands out in our flower bed. I can't wait for our flowers to fully bloom and all the colors to pop. This welcome sign is a great addition to any home and is also a great way to help make your guest feel welcomed. I received several compliments on the sign from our neighbors as soon as we put it up. Feel free to comment letting me know how your welcome sign turned out!
***My welcome sign is featured on Amazing Interior Designs - 10 DIY Welcome Signs for you Front Door/Porch. It is #3! It has also been featured on a few relators pages as home decor ideas for their new homes.


17 Comments
Hey! I know this is kinda off topic but I was wondering which blog platform are
ReplyDeleteyou using for this website? I'm getting sick and tired of Wordpress because I've had problems with hackers and I'm lookiing att
options for another platform. I would be gret if you could point
me in tthe direction of a good platform.
I'm sorry to hear that. I use the free blogging platform on Google's Blogspot. Blogspot doesn't have as much movement with pictures as Wordpress does but you can do the basics. You can edit the html to add anything you'd like but they don't have plugins like Wordpress either. I've used it for over three years and enjoy it! Good Luck!
DeleteI wwas suggested this website via my cousin. I am not positive whether
ReplyDeleteor not this submit is written by means of him as nobody else recognize suuch unique about mmy trouble.
You are incredible! Thanks!
Amazing! This blog looks exactly like my old one! It's on a completely
ReplyDeletedifferent subject but it has pfetty much the same page
layout and design. Wonderful choice of colors!
You made some decxent points there. I looked on the internet for additional information about the
ReplyDeleteissue and found most individuals will goo along with your views on this site.
This is really interesting, You're an excessively
ReplyDeleteprofessional blogger. I have joined your feed and sit
up for seeking more of yokur great post. Also, I've sared your website in mmy ocial networks
Thank you so much, glad you enjoy my blog!!!
DeleteHey I know this is off topic but I was wondering if you knew of any widgets
ReplyDeleteI could add to my blog that automatically tweet my newest twitter updates.
I've been looking ffor a plug-in like this for quite some time and wwas hoping maybe you would have some experience with
something like this. Please let me know if you run into anything.
I truly enjoy reading your blog and I look forward
to your new updates.
I don't know if this is what you are looking for but Twitter has a code you can copy and paste into your html that will put your Twitter feed in your sidebar. It will look similar to what I have -->
DeleteGo to Twitter settings - Widgets - Create New
WOW just what I was looking for. Came here by seearching for b
ReplyDeleteI could nnot resist commenting. Welll written!
ReplyDeleteI get pleasure from, cause I found exactly what I used to be having a look for.
ReplyDeleteYou've ended my four dayy lengthy hunt! God Bless you man. Have a
great day. Bye
I love looking through a post that will make people think.
ReplyDeleteAlso, many thanks for allowing for me to comment!
Can I simply just say what a comfort to find somebody that
ReplyDeletetruly understands what they are talking about on thee web.
You actuaoly realize how to bring an issue to light and make it important.
More people should check this out and understand this side of your story.
I can't believe you are not more popular given that you definitely have
thee gift.
I liie the valuable information you provide iin your articles.
ReplyDeleteI will bookmark your weblog and check again here regularly.
I'm quite cesrtain I'll learn many new stuff right here!
Best of luck for the next!
I am regular reader, how aare yyou everybody? This piece
ReplyDeleteof writing posted at this web site is genuinely nice.
Asking quesdtions are truly nice thing if you are not understanding
ReplyDeleteanything fully, however this post offers nice understanding even.