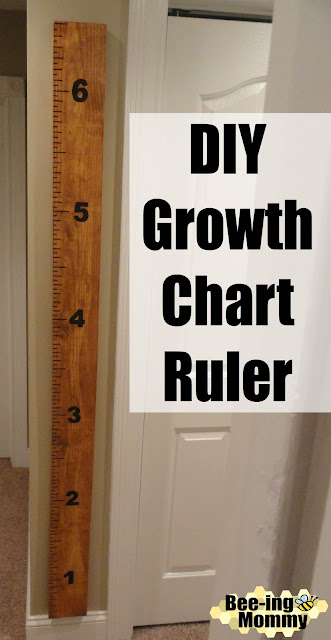
I've wanted a growth chart ruler for a while now but didn't want to fork out the $90 at Pottery Barn for one so I decided to make my own. My growth chart ruler cost me about $6 to make because I had all the supplies but the wood. If you don't have all the supplies it should run around $15 max.
The growth chart ruler is a great addition to any home, especially if you have young children because you can keep track of their growth on it. In most movies they show parents tracking their children's growth on the wall or door frame but what happens when you move and the wall gets painted over? A benefit of a growth chart ruler is that you can take it with you and it makes for some awesome wall decor.
The growth chart ruler is a great addition to any home, especially if you have young children because you can keep track of their growth on it. In most movies they show parents tracking their children's growth on the wall or door frame but what happens when you move and the wall gets painted over? A benefit of a growth chart ruler is that you can take it with you and it makes for some awesome wall decor.
Supplies:
- Wood Board (1 x 5 x 6)
- Sandpaper or Sander
- Wood Stain and Brush
- Printer numbers or Number Stencil
- Pencil
- Ruler
- Black Acrylic Paint and Thin Brush OR Black Paint Pen
- Spray Clear Gloss
- Picture Hanger and Hammer
How To:
1. We bought our wood board for about $6 at Lowes. Pick out a board that isn't bowed with a grain you like. Sand both sides and the edges of the wood board.
2. Stain the wood board any color you want to. Let Dry.
We used the a stain we already had, color Colonial Maple. If you don't have any stain laying around then purchase a small can of stainer. A small can runs between $3 and $5 depending on the brand and where you purchase it from. You don't need a lot of stain for the board. I put two coats on the top (side the numbers are on) and one coat on the other side.
We used the a stain we already had, color Colonial Maple. If you don't have any stain laying around then purchase a small can of stainer. A small can runs between $3 and $5 depending on the brand and where you purchase it from. You don't need a lot of stain for the board. I put two coats on the top (side the numbers are on) and one coat on the other side.
3. While your board is drying you can print out the numbers 1-6 in whatever font you prefer. I used Arial Black for my numbers. Turn the paper over and scribble with a #2 pencil on the back of the numbers.
4. Once your board is dry you can add your lines and numbers. I started marking my lines at 0.6" and went to 6.6". I only marked half inches, inches, and feet. Once you are done marking your lines you can trace the numbers. Line the numbers up with the foot line and outline the number with a pencil. If you colored enough pencil on the back of the paper, it should leave an outline of the number. You can kind of see it in the picture below.
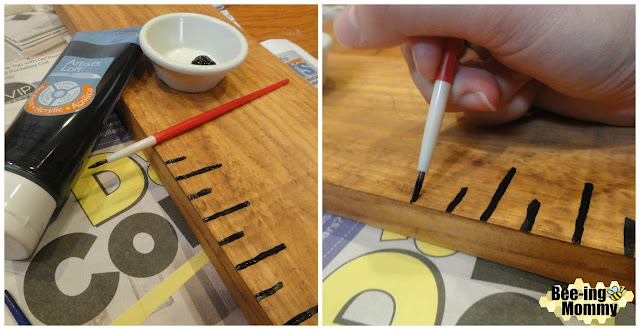
5. When all the lines and numbers are on the board it is time to go over them with black paint. I used black Acrylic paint and a thin paint brush. The amount you see in the container is all I ended up using so you don't need a ton of black paint for this project.
I painted the half inch lines half an inch long, the inch lines an inch long, every half foot (6") an inch and a half long and every foot is about 2 inches long. Let Dry.
I painted the half inch lines half an inch long, the inch lines an inch long, every half foot (6") an inch and a half long and every foot is about 2 inches long. Let Dry.
NOTE: If you used a darker stain you may want to use white paint instead of black so it will show up. You can also use a black paint pen it you'd like. Paint pens are basically sharpies but with paint instead of marker.
6. Once the black lines and numbers dried, apply a clear gloss sealant to the front of the ruler to lock in stain, paint, add a shine and make it last longer. Let Dry.
You can use any type of gloss finish, satin finish, mod-podge or just a plain waterproof finish. I used a the spray gloss.
You can use any type of gloss finish, satin finish, mod-podge or just a plain waterproof finish. I used a the spray gloss.
7. Add one or two sawtooth hangers to the back of the ruler. One should home the ruler but I added two to make it more secure; One toward the top and one toward the bottom. Hang your ruler in the location of your choice!
Optional: I personalized the ruler by writing our family name and the year we became a family on the back with a Sharpie so if it was ever lost they knew who it belonged to.
I marked my children's birth heights, my daughters height on her first Birthday and my husband and my heights now. You can keep track of your children's growths however you want. I mark their heights every year on their birthday but you can also track their growth monthly, quarterly or half. I have used an Ultra-Fine Point Sharpie marker and a thin tip paint pen track my children's growth. I draw a line, add the name and date and it dries almost instantly. You can't see it in the picture but you can see it fine in person and it doesn't rub off. I was afraid the Sharpie would not work because of the gloss but I tried to rub it off and it didn't come off.
I hope your Growth Chart ruler turns out as good as mine did. You don't have to be very crafty to make the growth chart ruler, you just need to know how to use a ruler and draw a line, the time spent making the ruler was well worth saving $50-$100.
I hope your Growth Chart ruler turns out as good as mine did. You don't have to be very crafty to make the growth chart ruler, you just need to know how to use a ruler and draw a line, the time spent making the ruler was well worth saving $50-$100.


0 Comments