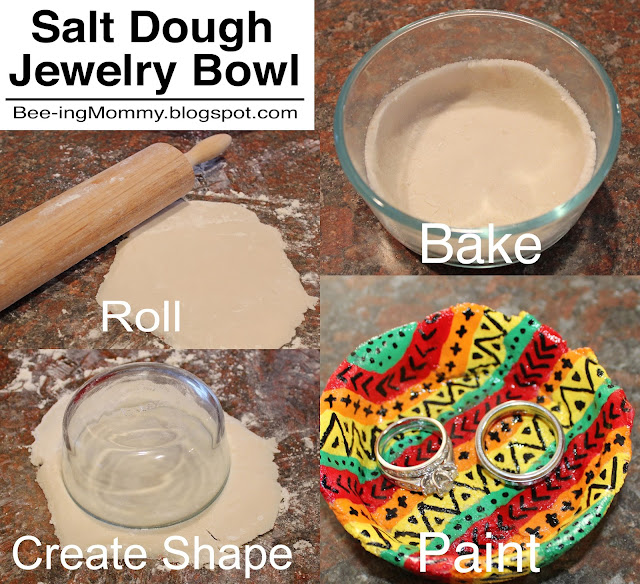
My mother-in-law and I share the same birthday which just so happened to fall on Father's Day this year so needless to say we had a busy weekend celebrating. I asked my husband if he had any gift ideas for his mom and he said she always laid her jewelry out on the dresser so possibly a dish or jewelry holder for her to set it in so it doesn't get knocked off.
I instantly thought of salt dough. I knew we had all the ingredients already and that you could make ornaments, hand print plaques, jewelry, etc... so I figured we could make a dish out of it too.
I instantly thought of salt dough. I knew we had all the ingredients already and that you could make ornaments, hand print plaques, jewelry, etc... so I figured we could make a dish out of it too.
The Salt Dough Recipe I used:
½ cup of salt
½ cup of flour
¼ cup of water
Mix. Create. Bake at 200˚ for 2-3 hours until hard. Let cool. Decorate.
The time depends on the thickness of the item you are making. Thicker items like bowls need to bake longer than thinner items like an ornament.

Salt Dough Jewelry Dish
½ cup of flour
¼ cup of water
Mix. Create. Bake at 200˚ for 2-3 hours until hard. Let cool. Decorate.
The time depends on the thickness of the item you are making. Thicker items like bowls need to bake longer than thinner items like an ornament.

This recipe made the amount of Salt Dough pictured above. It was enough to make a small, medium, and large bowl. If you have only a couple items to make I recommend using this recipe. If you are wanting to make a ton of ornaments I recommend doubling the recipe and using 1 cup of salt, 1 cup of flour, and ½ cup of water.
Supplies:
How To:

5. Bake at 200˚ for 2-3 hours until hard. Let cool.
The time depends on the thickness of the item you are making. Thicker items like bowls need to bake longer than thinner items like an ornament. We baked the jewelry dishes for about 2.5 hours.
6. Once the dishes have cooled, carefully remove the salt dough from the dish so it doesn't break.
Since this was a gift for my mother-in-law we let our two year old paint the jewelry dish. Once it dried I used a paint pen to write, "We Love You!" on the front and on the back I wrote who it was from and Happy Birthday.


- Salt
- Flour
- Water
- Mixing Bowl
- Rolling Pin
- Glass Dishes that can go in the oven
- Paint Brushes
- Acrylic Paint
- Paint Pen
- Rust-Oleum Ultra Cover Clear Gloss Spray
1. Mix the salt, flour and water in a mixing bowl until it thickens. It should feel like dough. If it is too runny add more flour, if it is too hard add more water.
2. Flour your surface and roll the dough flat. (The flour keeps the dough from sticking)
3. Create your shape. We used a smaller bowl to create a perfect circle then used a spatula to lift and move the circle without tearing the dough.
4. Place the dough in a Glass Baking Dish and press it into the dish to form it's shape.

5. Bake at 200˚ for 2-3 hours until hard. Let cool.
The time depends on the thickness of the item you are making. Thicker items like bowls need to bake longer than thinner items like an ornament. We baked the jewelry dishes for about 2.5 hours.
6. Once the dishes have cooled, carefully remove the salt dough from the dish so it doesn't break.
7. Decorate your jewelry dishes with acrylic paint. Let Dry.
Since this was a gift for my mother-in-law we let our two year old paint the jewelry dish. Once it dried I used a paint pen to write, "We Love You!" on the front and on the back I wrote who it was from and Happy Birthday.
8. Once the paint dried, I sealed the jewelry dish with Rust-Oleum Ultra Cover Clear Gloss Spray and let it dry. You can use any gloss spray you want. The gloss spray helps lock in the paint so it will last longer and it gives the jewelry dish an extra shine.
My mother-in-law loved her jewelry dish and said she will think of us every time she sees it. The jewelry dish is a great gift to give and it is unique because not very many people can master a two year old's painting skills. I also decorated the smaller jewelry dish and tried to give it a tribal design. I am currently using it to hold my rings when I need to take them off. I hope you enjoyed this tutorial and your jewelry dishes turn out great!


0 Comments